Understanding Exchange Role Based Access Control (RBAC)
Role Based Access Control (RBAC) is one of the most useful feature on Exchange 2016 or Exchange Online. Although RBAC has been there since Exchange 2007, It has been more enhanced and flexible on Exchange 2016. In Exchange 2007, the server permissions model applied only to the administrators who managed the Exchange 2007 infrastructure. In Exchange 2016, RBAC now controls both the administrative tasks that can be performed and the extent to which users can now administer their own mailbox and distribution groups.
RBAC assigns permission to users in to primary ways depending on whether the user is an administrator or specialist user, or an end-user.
-
Management Role Groups.
-
Management Role Assignment Policies.
Below are the details of the permission we have by default available on Exchange server.
| Admin Role | Description | Assigned Roles | Members | Managed by | Write Scope |
| Compliance Management | This role group will allow a specified user, responsible for compliance, to properly configure and manage compliance settings within Exchange in accordance with their policy. |
|
pdhewaju.com.np/Microsoft Exchange Security Groups/Organization Management | Default
|
|
| Delegated Setup |
Members of this management role group have permissions to install and uninstall Exchange on provisioned servers. This role group shouldn’t be deleted. |
|
pdhewaju.com.np/Microsoft Exchange Security Groups/Organization Management | Default | |
| Discovery Management |
Members of this management role group can perform searches of mailboxes in the Exchange organization for data that meets specific criteria. |
|
pdhewaju.com.np/Microsoft Exchange Security Groups/Organization Management | Default | |
| Help Desk |
Members of this management role group can view and manage the configuration for individual recipients and view recipients in an Exchange organization. Members of this role group can only manage the configuration each user can manage on his or her own mailbox. Additional permissions can be added by assigning additional management roles to this role group. |
|
pdhewaju.com.np/Microsoft Exchange Security Groups/Organization Management | Default | |
| Hygiene Management | Members of this management role group can manage Exchange anti-spam features and grant permissions for antivirus products to integrate with Exchange. |
|
pdhewaju.com.np/Microsoft Exchange Security Groups/Organization Management | Default | |
| Organization Management | Members of this management role group have permissions to manage Exchange objects and their properties in the Exchange organization. Members can also delegate role groups and management roles in the organization. This role group shouldn’t be deleted. |
|
exgadmin | pdhewaju.com.np/Microsoft Exchange Security Groups/Organization Management | Default |
| Public Folder Management |
Members of this management role group can manage public folders. Members can create and delete public folders and manage public folder settings such as replicas, quotas, age limits, and permissions as well as mail-enable and mail-disable public folders. |
|
pdhewaju.com.np/Microsoft Exchange Security Groups/Organization Management | Default | |
| Recipient Management |
Members of this management role group have rights to create, manage, and remove Exchange recipient objects in the Exchange organization. |
|
pdhewaju.com.np/Microsoft Exchange Security Groups/Organization Management | Default | |
| Records Management |
Members of this management role group can configure compliance features such as retention policy tags, message classifications, transport rules, and more. |
|
pdhewaju.com.np/Microsoft Exchange Security Groups/Organization Management | Default | |
| Server Management |
Members of this management role group have permissions to manage all Exchange servers within the Exchange organization, but members don’t have permissions to perform operations that have global impact in the Exchange organization. |
|
pdhewaju.com.np/Microsoft Exchange Security Groups/Organization Management | Default | |
| UM Management |
Members of this management role group can manage Unified Messaging organization, server, and recipient configuration. |
|
pdhewaju.com.np/Microsoft Exchange Security Groups/Organization Management | Default | |
| View-Only Organization Management
|
Monitoring
View-Only Configuration View-Only Recipients |
pdhewaju.com.np/Microsoft Exchange Security Groups/Organization Management | Default |
Assign RBAC to Normal user
To assign RBAC to follow the process below:
-
Login to the Exchange Control Panel (ECP) with exchange administrative rights.
-
Select ‘Permissions’ on left panel and select ‘admin roles’ tab on central panel.
-
Choose which role needed to be assign to the user, and click on edit icon.
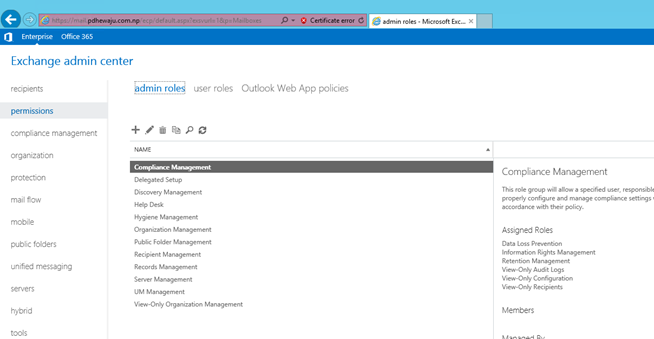
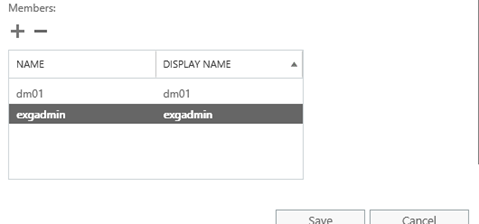
- A new window will get open, scroll down to the Members section and Add new members. Once the members are added click on Save.
Create a new Role Group Policy
To Create a new Role Group Policy, follow the below steps:
-
Login to the Exchange Control Panel (ECP) with exchange administrative rights.
-
Select ‘Permissions’ on left panel and select ‘admin roles’ tab on central panel.
-
Choose which role needed to be assign to the user, and click on ‘+’ icon.
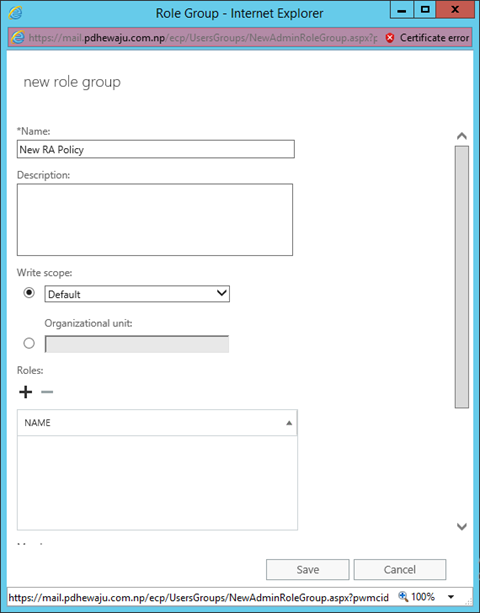
- A new window of ‘Role Group’ will get open. Assign the name of the of Role and select the that need to be assigned to this group from list.

- After assigning the list of roles to the Role Group, assign the users to whom these roles are to be associated.
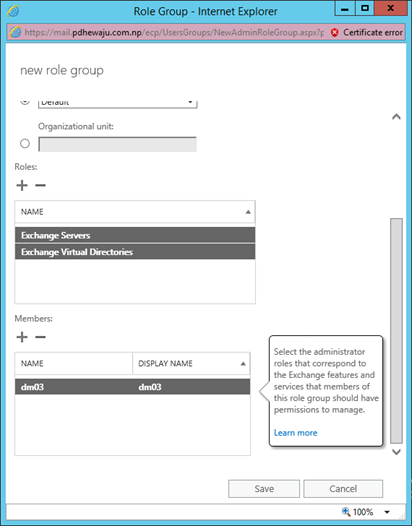
- Once the task is completed, click on Save to close the window.

-
After the completion of task, you can see a new policy as of others on ‘admin roles’ TAB.
Create a new Role Assignment Policy
As of the RBAC, Exchange server do have also feature on what permission can be provided to users to get edit using their own personal ECP or going to the setting of their OWA.
As of RBAC, New Role Assignment Policy can be created as below:
-
Login to the Exchange Control Panel (ECP) with exchange administrative rights.
-
Select ‘Permissions’ on left panel and select ‘user roles’ tab on central panel.
-
Choose which role needed to be assign to the user, and click on ‘+’ icon.
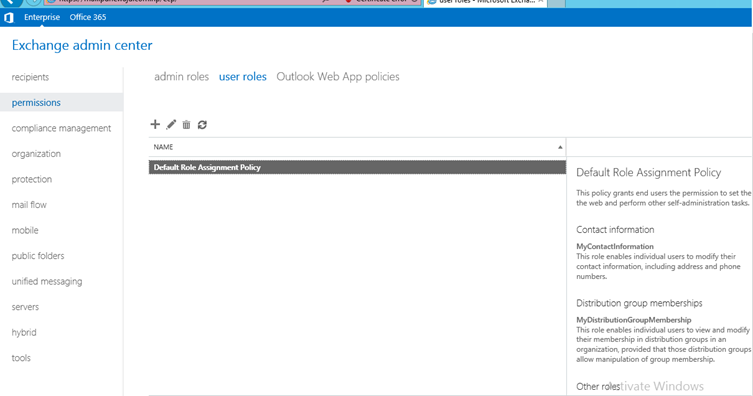
A new window will get open with below options, on which we can just check mark to enable the permission to the users.

PowerShell Command for Role Assignment Policies:
Create new Role Assignment policy:
New-RoleAssignmentPolicy <assignment policy name> -Roles <roles to assign>
Assign/change a Role Assignment policy to the user:
Set-Mailbox <mailbox alias or name> -RoleAssignmentPolicy <assignment policy>
Remove Role Assignment Policy:
Remove-RoleAssignmentPolicy <role assignment policy>
Hope this will help you to manage delegated admin on the Exchange server more efficiently. J
![[Step by Step] Instant Messaging Integration between Exchange 2016 OWA and Skype for Business 2015](/wp-content/themes/ribbon-lite/images/nothumb-related.png)